When you store your sensitive data on portable, external drives, securing them against unauthorized access, or even unwanted deletion, is essential. Here’s how to lock and encrypt external USB drives for better security.
To protect external drives from unauthorized access & unwanted data deletion, you need to ensure that when the drive is connected, it needs an access password to mount the drive, or to read/write data on the drive even after it’s mounted.
Note: All of the solutions mentioned in this article, unless explicitly specified, use AES-256 or higher encryption standards for protecting USB drives.
Lock removable drive on Windows
Most modern versions of Windows ship with BitLocker Drive Encryption (BitLocker To Go) software, which, along with system drives, provides a way to lock external USB drives with password. You can even lock and encrypt drives without deleting existing data using BitLocker.
We’ll walk through the steps required to lock an external drive with password on Windows with BitLocker Drive Encryption.
Note: If you use Windows 10 Home, BitLocker isn’t available for your PC. You may either upgrade to Windows 11 or consider third-party solutions for locking your removable USB drive.
- Plug in the USB drive that you want to lock and ensure it’s detected in Windows.
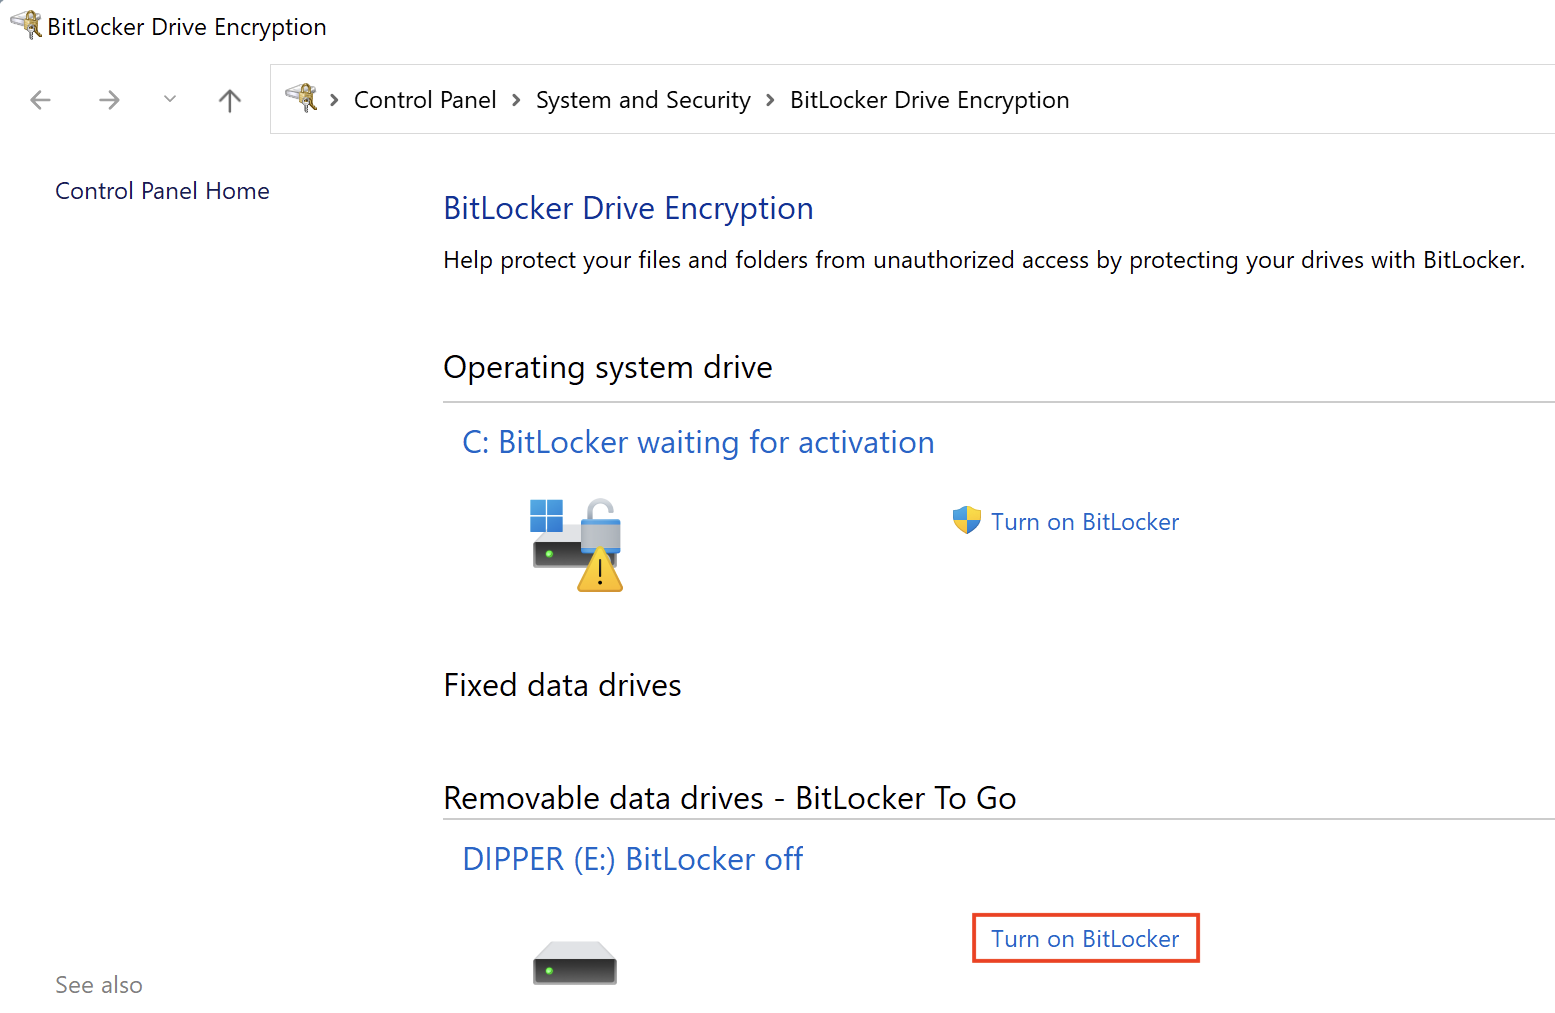
- Open up Windows Search, type “bitlocker”, and click Manage BitLocker from the results. Alternatively, open Control Panel and navigate to System and Security >> BitLocker Drive Encryption.
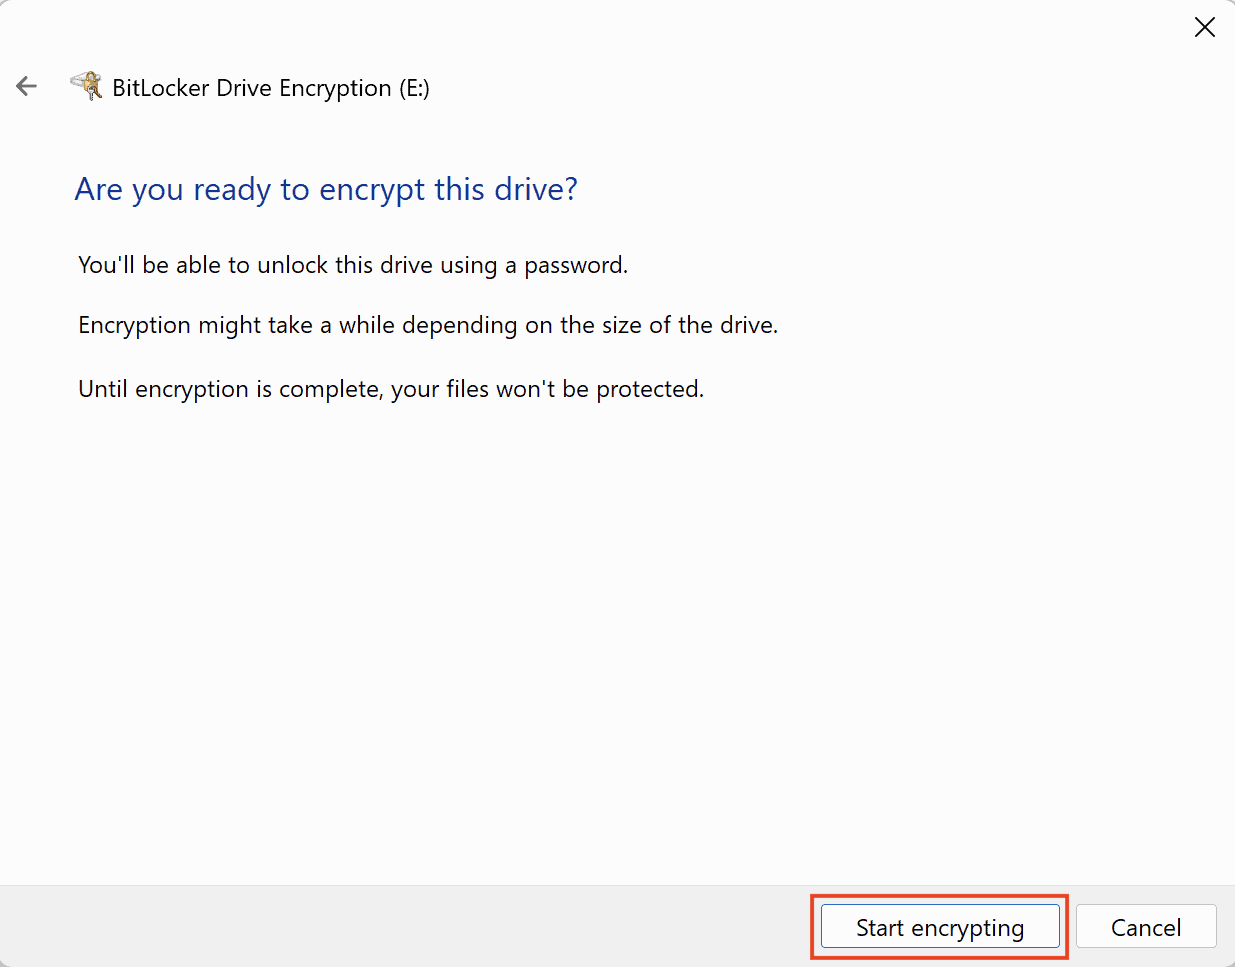
- Find the desired external USB drive under the “Removable data drives – BitLocker To Go” section and click Turn on BitLocker adjacent to the drive.
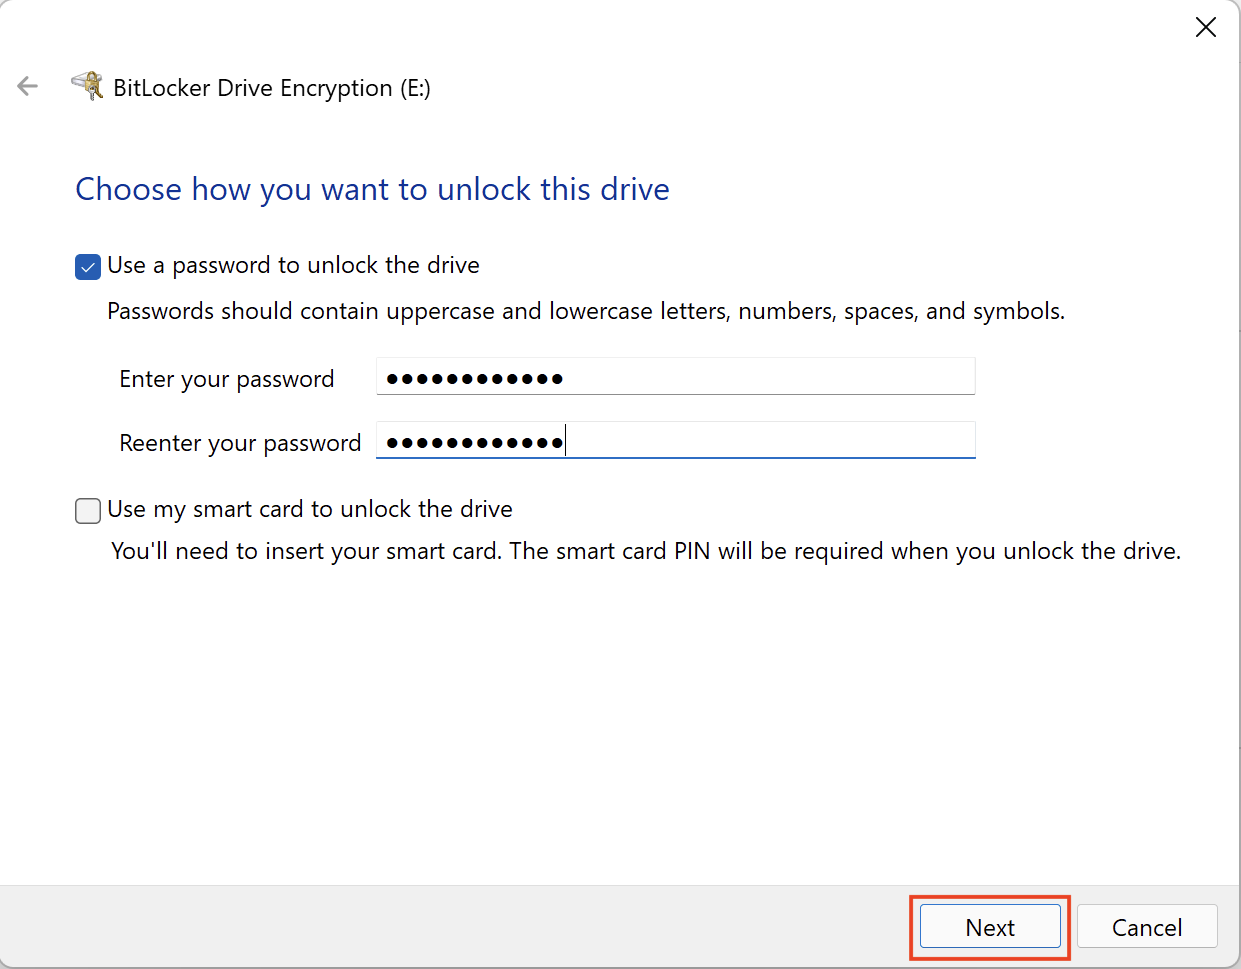
- Provide the password with which you want to lock and encrypt your drive. Repeat the same to confirm. Click Next to proceed.
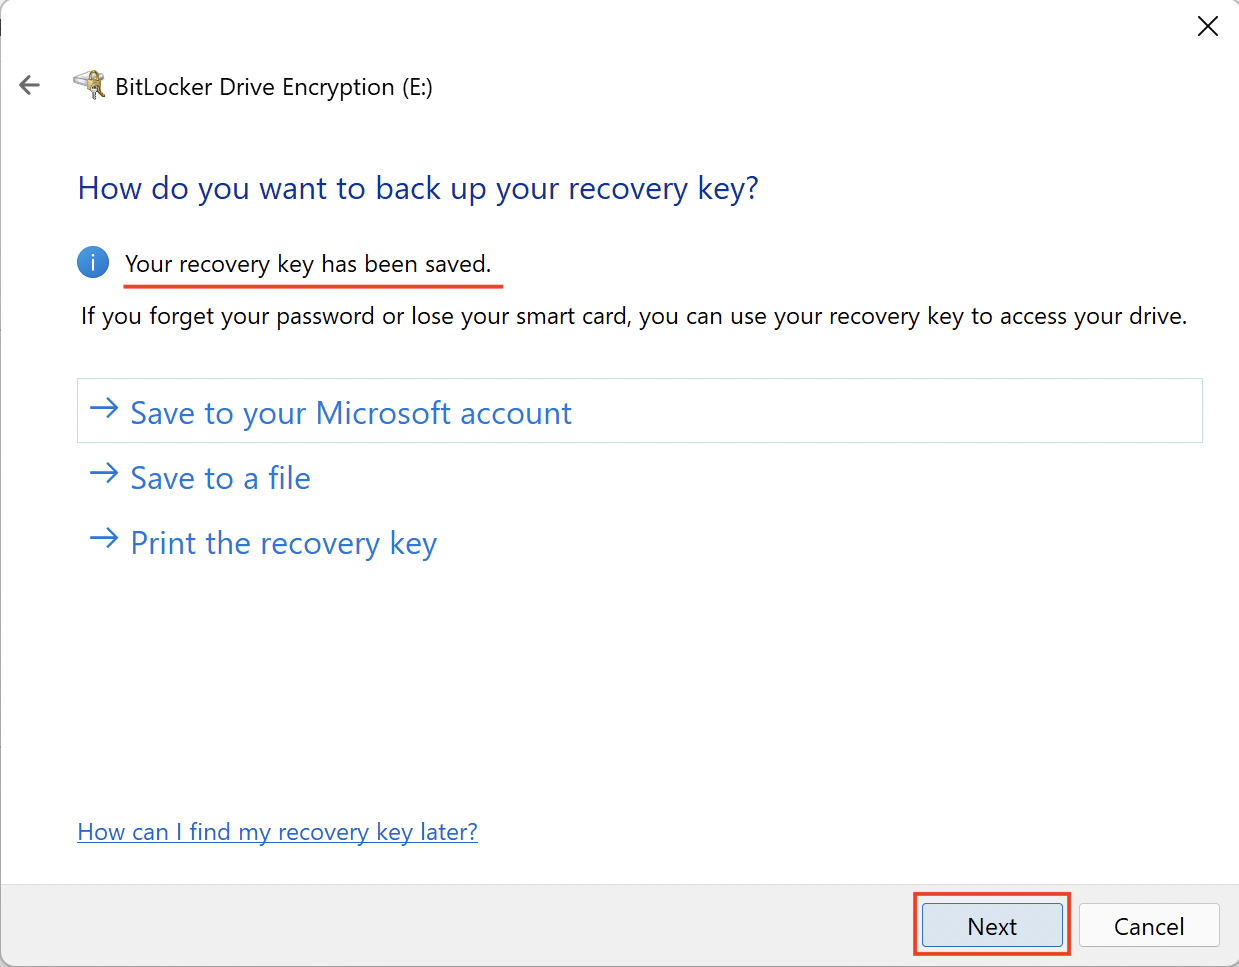
- Choose a recovery method to access your drive if you lose your password. Click Next when done.
- Choose the encryption level. “Encrypt entire drive” is slower and usually recommended for drives already in use, while “Encrypt used disk space only” is faster and recommended for newly formatted drives. Click Next.
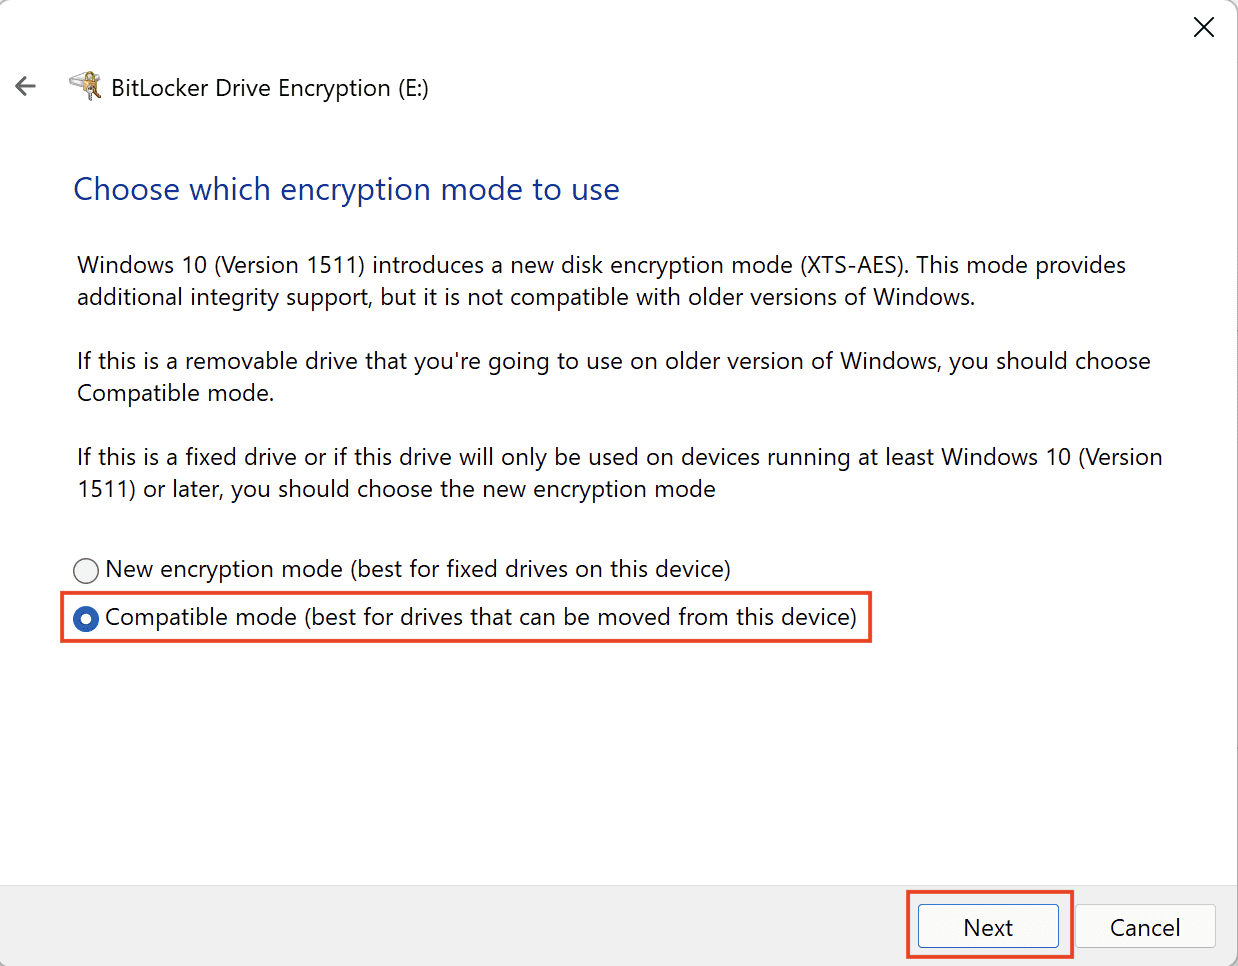
- Choose Compatible mode (suitable for removable drives) and click Next.
- Finally, click on Start encrypting and wait for the process to complete.


Once encryption is completed, you can eject and reconnect the drive. Windows will ask you for the drive password to access it. Moreover, other users won’t be able to format the drive unless they provide the password.

Note: If you encrypt your removable drives using this method, you won’t be able to natively unlock or decrypt them on non-Windows systems (such as macOS, Linux, etc.). However, you might be able to read a BitLocker encrypted removable drive on such platforms with the help of third-party driver software.
Lock USB drive without BitLocker
If, for some reason, you can’t use BitLocker on Windows, you may consider some third-party USB locking utilities instead. A few such popular third-party programs are listed below.
Encrypt external USB drive on Mac
Similar to Windows, macOS also offers a native solution to encrypt removable drives. You can do this using the “Encrypt Drive” option either in Finder or via Disk Utility.
Using Finder
The below steps will guide you to lock and encrypt an external USB SSD or hard drive on Mac from Finder.
- Connect your external USB drive to your Mac.
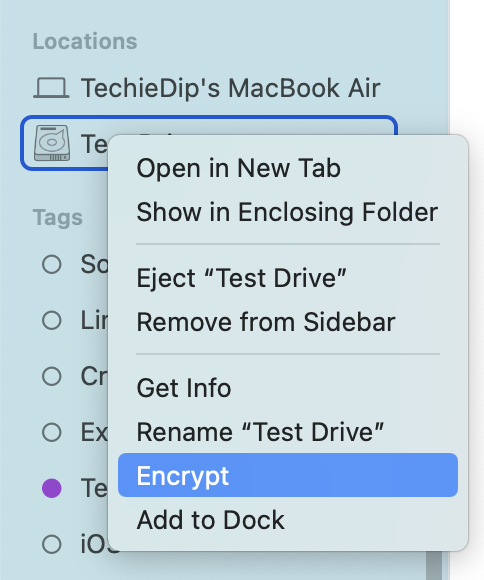
- Open a Finder window and right-click on the USB drive in the left pane.
- Click Encrypt [Drive Name].
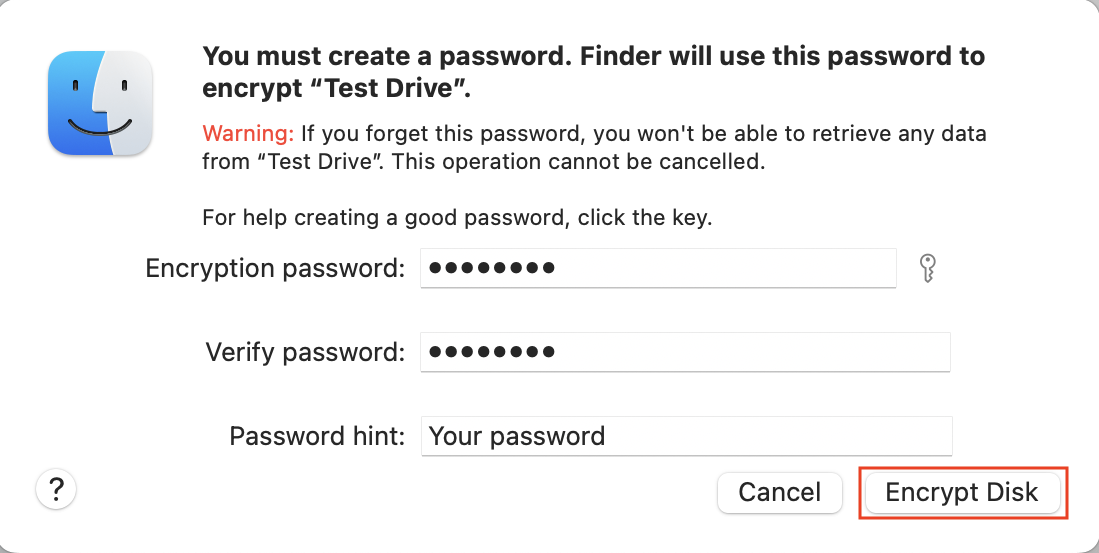
- Provide a password to lock the drive, along with an optional hint.
- Click Encrypt Disk.
Wait for the process to complete. The process may take a few minutes to a few hours, depending on the size of your disk and the type of drive (SSD or HDD) you have.
If you don’t see the Encrypt Drive option, it may be because the disk is formatted in NTFS, ExFAT, or some other format not natively supported in macOS. In this situation, you can lock your external drive using Disk Utility.
Using Disk Utility
Warning: To use this method, you need to erase the entire drive before you can lock and encrypt it with password. Hence, this method is recommended only for new drives with no data. Alternatively, you may consider moving the files from the external drive to another temporary location and moving them back once the process completes.
- Connect your external USB drive to your Mac.
- Open Disk Utility by searching it in Spotlight Search (Cmd + Space) or by navigating through Applications >> Utilities >> Disk Utility via Finder.
- In Disk Utility, right-click on the drive from the left pane and select Erase…
- In the pop-up window, provide a name for the drive, and select APFS Encrypted (ideal for SSDs) or Mac OS Extended (Journaled, Encrypted) (suitable for regular hard disks) from the Format drop-down list.
- Provide a password to lock the drive, along with an optional hint.
- Click Choose.
- Finally, click Erase to format and create your encrypted drive.
After the encryption process completes, eject the drive and plug it back in. macOS will prompt for the drive password you set earlier to mount the drive.
Note: You have the option to save the drive unlock password in iCloud Keychain, but doing so will automatically mount your secure drive on your Mac without prompting for the password.
Tip: If you want to encrypt only specific files & folders and not your entire external hard drive, you may consider creating a secure sparsebundle disk image inside the drive and moving your sensitive data inside the encrypted disk image.
That way, you can mount the external drive just like any other disk drive, to access its unprotected files. And when you want to access the secure files, double-click on the sparsebundle image saved within the external drive and provide the password to mount it as a virtual drive (so you can browse the secure files).
Cross-Platform solutions
Both BitLocker (Windows) and macOS-native drive encryption are ideal solutions to lock USB drives for use within the respective platforms. However, if you’re looking for a cross-platform drive locking/encryption solution, you need to consider other alternatives.
Here, you have 3 categories to choose from:
- Some external drives come with on-device data protection mechanisms, which support passcode or biometric-based authentication, and hence are platform-independent.
- Your external USB drive manufacturer may provide specific utilities to lock and protect your hard disk or SSD compatible with both macOS and Windows. Or,
- A third-party, cross-platform USB protection software may be available to lock external USB drives from any manufacturer.
Secure USB Drives
Secure external USB drives provide hardware-based (usually 256-bit AES) encryption to protect data on the drive. You need to provide the unlock key (either a passcode or a biometric input) directly on the drive to access these drives.
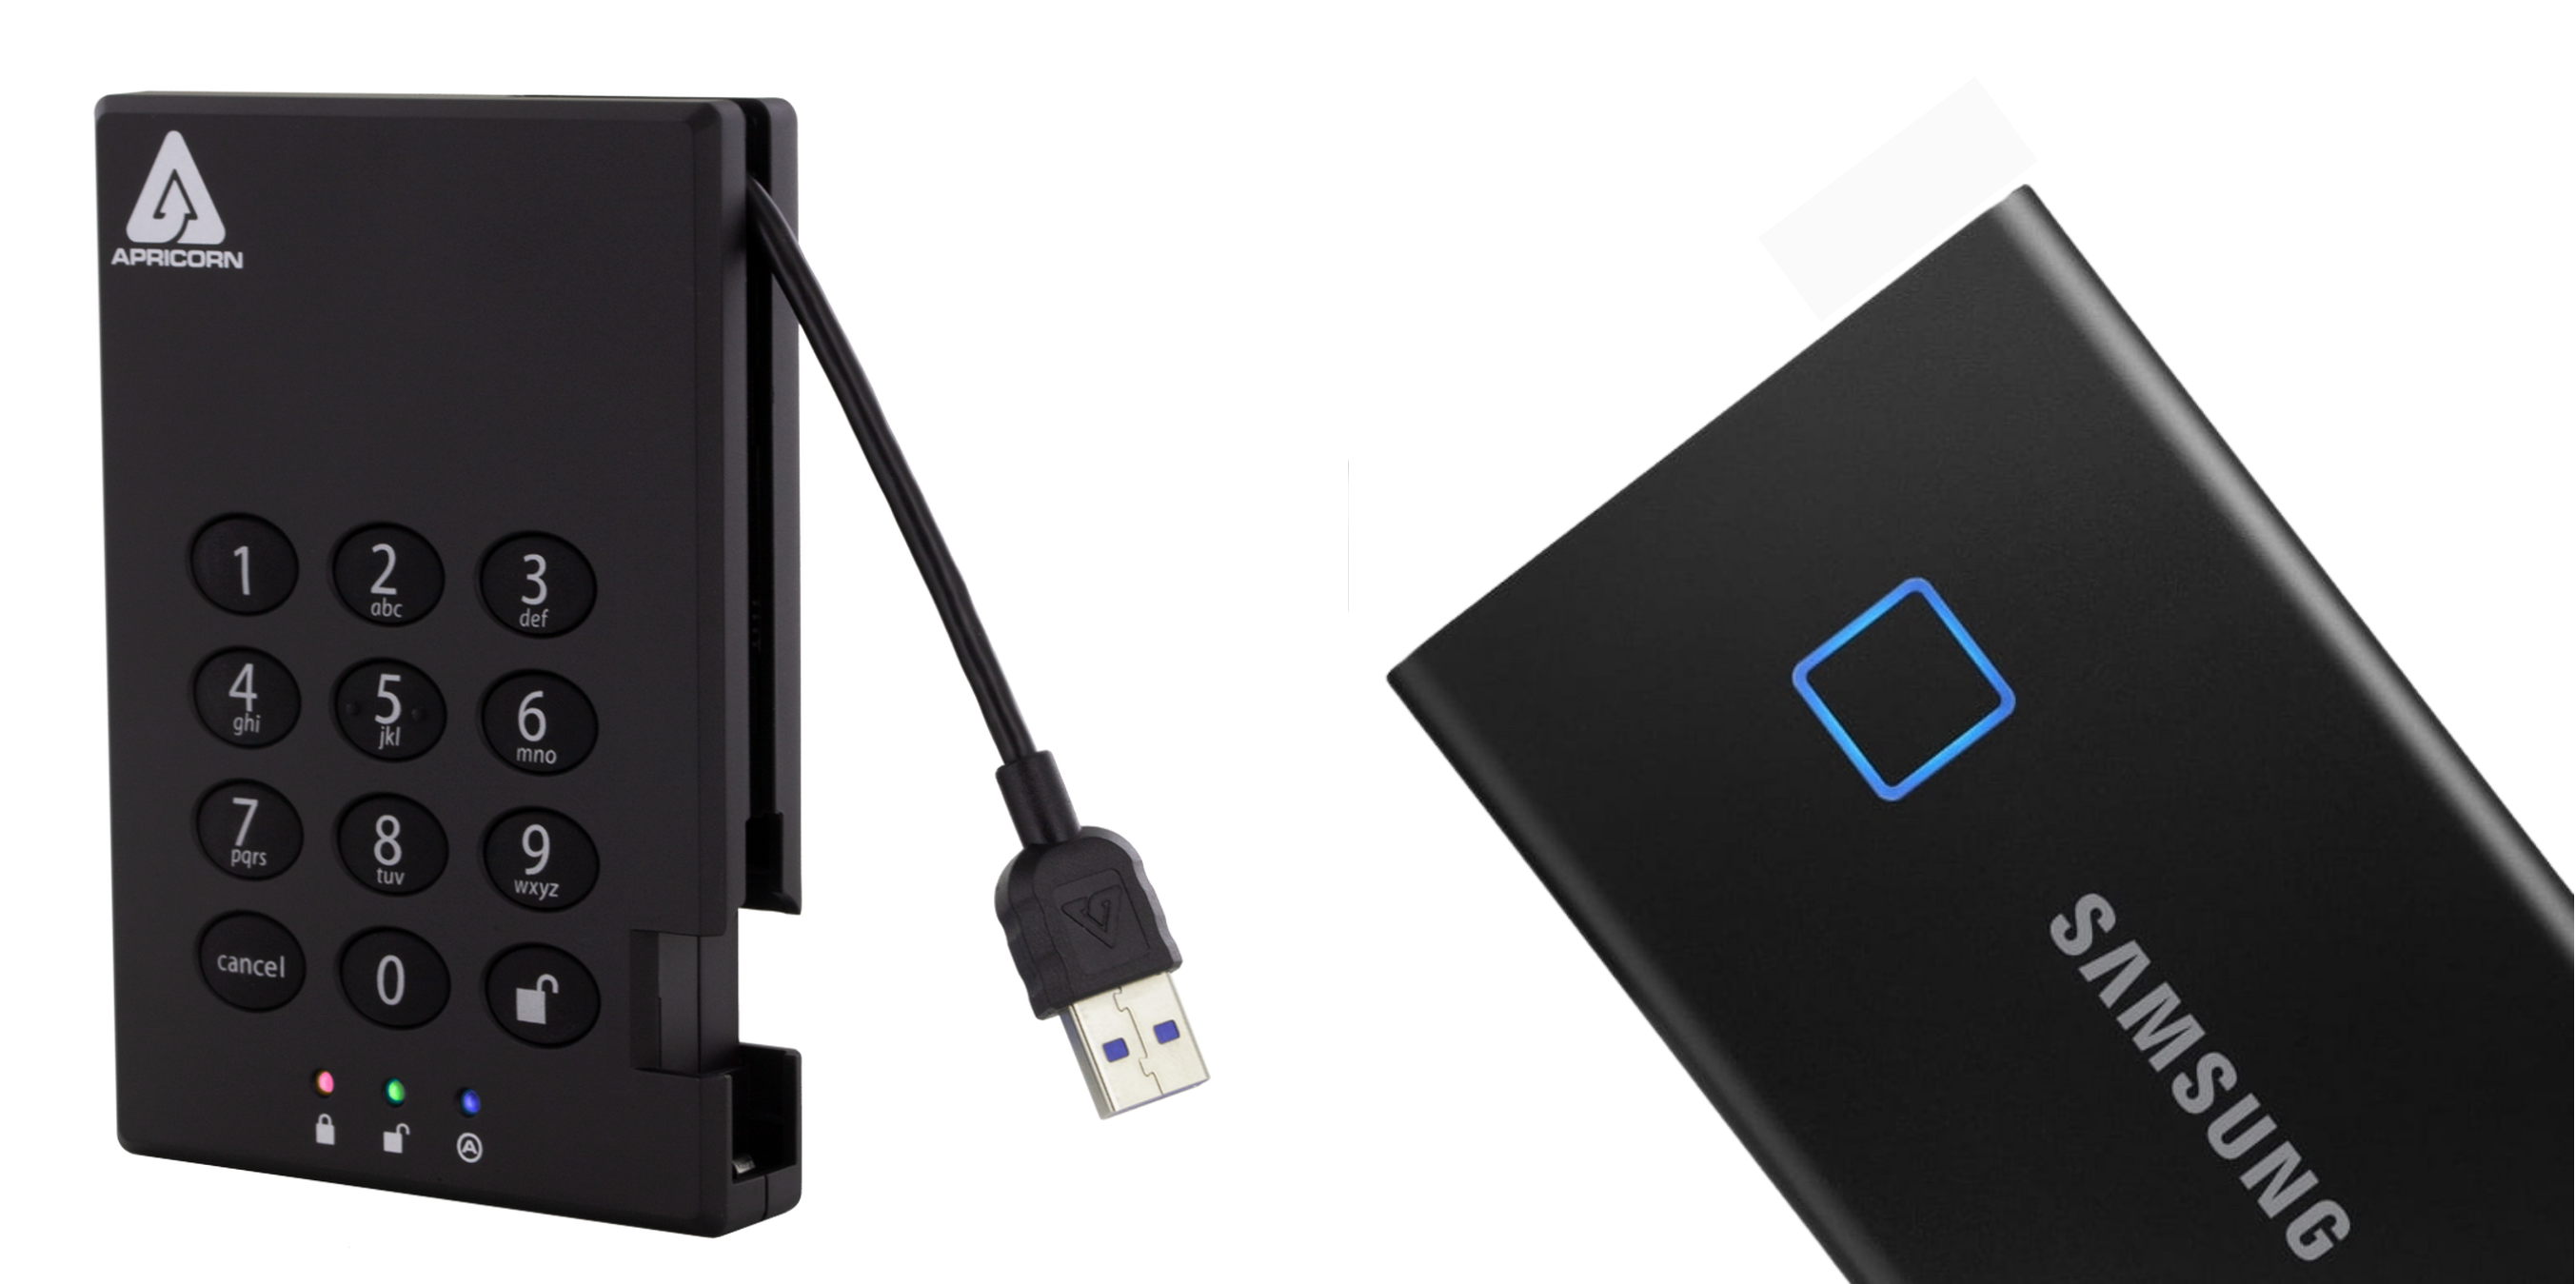
Some examples of such drives include Samsung T7 Touch Portable SSD, Aegis Encrypted Portable HDDs & Flash Keys, and more.
Security Software from Manufacturers
Security software from drive manufacturers is usually preferable, as you get dedicated features and support directly from your drive manufacturer. However, if your drive manufacturer doesn’t provide a dedicated USB-lock solution for your drive, third-party USB security software is your only feasible option.
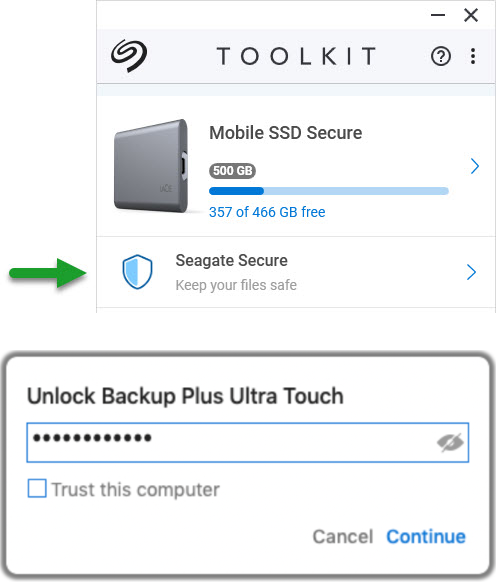
If your external USB drive is a compatible Seagate Backup series or LaCie drive, you can download and install Seagate Secure Toolkit for macOS and Windows.
If you’re using a compatible WD hard drive or SSD, you can install and use WD Security software to protect your external drive with password on macOS and Windows.
Third-Party Solutions
If your drive manufacturer doesn’t provide a cross-platform password protection utility for your USB drive, you may consider using a third-party, cross-platform, open-source solution such as VeraCrypt to password-protect your USB drive.

VeraCrypt is relatively user-friendly, stable, reliable, and supports multiple encryption algorithms. You can refer to the Beginner’s Tutorial and other documentation on the official website for detailed guides.
Of course, if you’re interested in exploring more, there are other programs available from third-party vendors with similar security features.
Prevent Unauthorized Deletion
When you encrypt data on an external drive, it’s primarily protected against unauthorized access. But, encryption doesn’t inherently protect against unauthorized deletion.
Although some of the solutions mentioned here, such as BitLocker To Go, require you to unlock the drive before formatting it, features like these are platform-specific and not native to the solution itself.
And, if someone wants to, they can connect the drive on a different OS or find a solution to force-mount the drive and perform a full drive format to wipe all the data.
However, you can make formatting a drive difficult for unauthorized users with cross-platform tools (especially those issued by your USB drive manufacturer, like WD Security), or on-device solutions that prevent the mounting of your drive unless the password is provided.